Windows 10 – there was a problem resetting your PC. Windows is currently serving as one of the leading operating systems in the market. It has launched various versions in the market and almost all of them were big hits during their tenure.
Windows 10 is currently leading the trend and the best thing about it is that it offers users the freedom of resetting their systems and bringing out their OS to its default state.
Thinking why rest the default Windows settings? Well, guys, it is the best way to eliminate various bugs from your computer system and especially those that are preventing your computer system from working properly.
If “There was a problem resetting your PC Windows 10” is the error message consistently flashing out on your home screen at this moment while resetting your PC; just get relaxed; as we are here going to provide you different solutions for the same.
How to fix Windows 10 there was a Problem Resetting your PC

Introduction of bug or malware attack on PC can badly affect its booting system. To overcome the situation in a better way; Windows first runs into Automatic Repair Wizard so that it can repair the fix the issue automatically.
The situation becomes much more annoying when it also fails to execute. You can Refresh or Reset your system to solve this issue permanently.
- Force Delete Files or Folders in Windows 10
- Delete Windows.old Folder in Windows 10
- Stop Service Host Delivery Optimization High Network Usage
There was a problem resetting your PC Windows 10 is one of the most annoying error issues one might face especially resetting their PC. We are here going to introduce you to the different solutions to this problem.
But before proceeding further with the process; it would be quite beneficial for you that you will get to know about some of its reasons and diagnosis so that you can better deal with it. the problem can arise when:
7 Different Solutions to fix “There was a problem resetting your PC Windows 10”
This is a common problem that every Windows 10 users face. You should check, there was a problem resetting your PC troubleshooting to fix your computer in seven ways.
1. Make use of Run Startup Repair Option
You have to make use of Windows 10 installation media here. The only things you have to follow on here are:
1. Use Windows 10 installation media such as CD or USB to get started with the Run Startup Repair option.
2. Restart your computer system.
3. You will be now asked to press any key to initiate the booting from CD or USB attached.
4. Just select the language you are willing to go along with and then press Next to go further with the solution.
5. Tap on the Repair your computer option.
6. Now click on Choose an option being flashing out on your screen and then tap on Troubleshoot to go further. Tap on Advanced options and then click on Automatic Repair to proceed further.
7. It will take a few seconds to complete the scanning process. Once done; remove the installation media and start your Windows 10.
8. Try to rest your PC to check whether it is working properly or not.
2. Repair Windows System Files
1. Go to the Settings option of your device and then move ahead with the Update & Security section.
2. Tap on Recovery followed by Advanced startup option.
3. Tap on Restart now and then move ahead with the Troubleshoot section.
4. Next, tap on Advanced options and then press the Command Prompt.
5. Once done with the above process; now select the administrator account of your PC and then enter the password you are using it here to launch.
6. Once done use PowerShell and then enter SFC /Scannow in the command prompt.
7. It will take a few minutes to accomplish the SFC scan now.
8. Just wait for the process to accomplish and once done; try to reset your PC again.
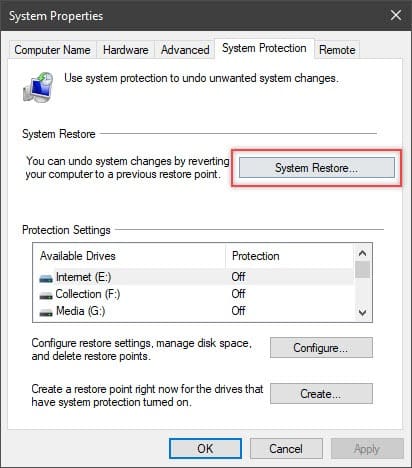
3. System Restoration
1. Click on the Start button and then type “system restore” in the search box.
2. Select Create a Restore Point option from the provided ones.
3. Once done; tap on the System Restore option and then press the Next button.

4. Either select the Recommended restore or Choose a different restore point and click Next to go further with the process.
5. Confirm the restore point of your device and then press Finish to get started with.
4. Make use of a USB Recovery Drive
1. You have to make use of at least 16GB empty USB Flash drive here. Just insert it into your device to initiate the USB recovery drive process.
2. Tap on the Start menu option and then type recovery drive in the search box.
3. Tap on the Create a recovery drive from the provided list of options.
4. A pop-up message will open up on your device just click YES to go further with the process.
5. Now select the USB drive and then tap on the Next button to proceed further.
6. Tap on the Create section and wait for fewer seconds.
7. Once done; tap on Finish to complete the process.
8. Reboot your Windows 10 and then press the F12 key.
9. Select to boot from your USB recovery drive followed by selecting Troubleshoot and Recovery from a drive.
That’s it. The problem will have surely solved out now and if not; you can try up the other solutions being mentioned below.
5. Install Fresh Windows 10
Before starting up the process; just make sure to backup your Windows 10 so that you can’t lose any kind of useful information out there.
1. Insert the Windows 10 installation media into your device and then restart your computer system.
2. Click on F2 or F12 key to boot your computer using the bootable device.
It will take up to a few seconds to install a fresh Windows 10. Once done; just follow on the provided instructions to move forward with the process.
6. Enable Or Disable Windows Recovery Environment
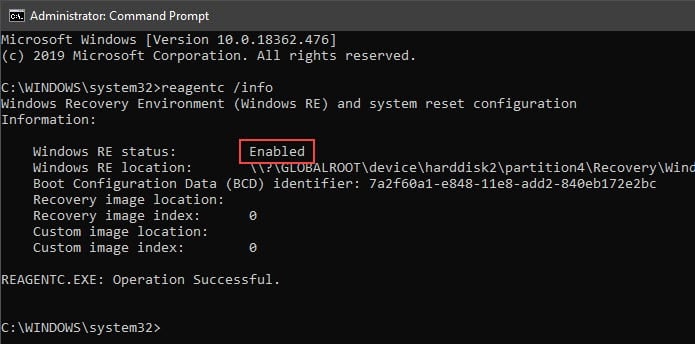
WinRE or Windows Recovery Environment is used to troubleshoot common issues of the unbootable Windows 10 operating systems. You can even disable and enable WinRE also for the same.
All you have to do is add the following commands just by pressing the Enter key each time. Don’t forget to open CMD as Administrator; otherwise, it won’t work.

reagentc /disablereagentc /enable
You can always check the status by following the command reagentc /info.
7. Rename System and Software Registry
The renaming system and software registry are other wonderful solutions for the same. You have to add the given commands on CMD by following the Enter button here.
cd %windir%\system32\config
ren system system.001
ren software software.001
Once it’s over, closes the command prompt and then tap on Continue to boot your Windows 10.
Conclusion
There was a problem resetting your PC in Windows 10 is a common problem these days. We have covered all the solutions to fix this problem. If you are facing any issue regarding this, then comment below or if you have any other solutions then please share with us.


