If you are reading this post, that means you are facing the problem related to stop service host delivery optimization network usage. Let’s tell you the story. There are two computers connected with my 4Mbps broadband connection.
Everything was going fine, but suddenly I faced a slow browsing issue in both of the machines. Let me inform you that, both of the PCs are having Windows 10 Pro with build number 17134.285.
Then I contacted the broadband service center and they told me that something is using all of your bandwidth. But, nothing was downloading from any of the computers.
Then I opened the Task Manager and found that a process named “Service Host: Delivery Optimization” is using 80-90% of my Internet’s bandwidth. This is common for most Windows 10 users.
If you are using this operating system, then don’t need to worry about it. There are few fixed available that can disable service host delivery optimization in Windows 10 computers.
What is Service Host Delivery Optimization?
Do you know what is service host delivery optimization? Windows 10 presents the Windows Update Delivery Optimization feature, wherein your computer may get upgrades from or send upgrades to nearby computers or servers on your system.

Additionally, it is enabled by default in Windows 10 Home and Pro which will immediately irk a whole lot of people. Although this might imply that you get upgrades much quicker, it would also leave you behind with bigger bandwidth bills.
It’s possible to stop Microsoft Windows from making use of your bandwidth.
Think about it along precisely the exact same line as the way the torrent works. Your pc is unwittingly employed as part of a peer-to-peer system to distribute files, which essentially means it’s using your upload bandwidth to deliver updates to additional computers.
Fortunately, users are ready to “opt out” of this kind of experience, but really, Microsoft shouldn’t have switched this on by default, and even more should not have concealed away from the menu so deep within Preferences.
How to Stop Service Host Delivery Optimization in Windows 10
Here I have shared a few working ways to turn off Windows Update Delivery Optimization. Let’s know the procedure, that how I stopped it. You should also check Trippy Desktop backgrounds for your Windows 10 PC.
1. Kill Service Host Delivery Optimization (Temporary)
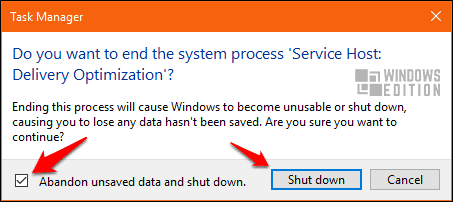
This is a temporary solution to this problem. You can forcefully shut down this process to stop using your Internet bandwidth. To do that, Right-click on the taskbar and click on “Task Manager” or press Alt+Ctrl+Del to do the same.

Now, on the Processes tab look for Service Host: Delivery Optimization. Once you got it, Right-click on that process → Tick on “Abandon unsaved data and shut down” → Click on Shut down button. That’s it.
Note But keep in your mind that, this process can start automatically after a while or when you restart the PC. But, it’ll sure work for you for a limited time.
2. Pause Windows Update (Temporary)
The latest version of Windows 10 supports the Pause feature to stop your system to update automatically. This feature allows you to disable the automatic update process for 35 days. This is another reason why your computer eats a lot of Internet bandwidth.

To pause the update for 35 days and get rid of this problem, navigate to Settings → Update & security → Windows update → Advanced options and turn on the “Pause Updates” option.
It’ll temporarily pause updates from being installed on your device. You can check the complete tutorial on how to turn off automatic updates in Windows 10.
3. Metered Connection (Permanently)
According to Microsoft, A metered connection is an Internet connection that has a data limit associated with it. Cellular data connections are set as metered by default.
Wi-Fi and Ethernet network connections can be set to metered but aren’t by default. Some apps might work differently on a metered connection to help reduce your data usage. Also, some updates for Windows won’t be installed automatically.
You have to set a Metered connection for both your WiFi and Ethernet connection. On my PC, there is no WiFi connection, but if you have a laptop, you have to do the below procedure for both WiFi and Ethernet.

1. Open Settings in Windows 10 and navigate to the “Network & Internet” option.
2. Here, you’ll get both WiFi and Ethernet options, but here I am demonstrating the Ethernet option only.
3. Click on the Ethernet option and choose the connected network which is currently in use.
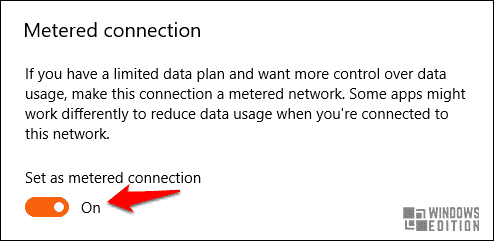
4. Now, turn on the “Set as metered connection” option. Do the same with WiFi also.
Can I disable the delivery optimization service?
Yes, you can disable the delivery optimization service. But it’s not recommended to do such things.
Is it safe to delete delivery optimization files?
You Can Delete Delivery Optimization Files to Free up Disk Space. It only influences the Windows update process if you delete these files.
Conclusion
Now you are done! That was all about how to stop service host delivery optimization high network usage in Windows 10. If any of your Windows apps are updating or using your Internet, then it’ll stop instantly.
If you found this tutorial helpful, then don’t forget to share it with your friends.


