
This is a common query for every Windows 10 user, how to turn off automatic updates in Windows 10. Windows 7 was my favorite. I have tried Windows 8 and 8.1 but they didn’t meet my requirements.
After upgrading to 10, I came to know it is something like what I have been waiting for. It supports all of my installed applications of Windows 7. The main problem with Windows 10 is, it is an Internet data eater. That means, like previous versions, you can’t change the Windows update setting to manual or turn it off.
If your Internet connection is slow or you are using a limited data plan, then this will create a big problem for you. Then, how to disable automatic updates in Windows 10?
Microsoft’s move to automatically upgrade all Windows 10 computers has received a great deal of flak from customers. It not only consumes huge Internet data but also slows down productivity.
That is why you would like to postpone or block Windows from automatically downloading updates for your computer.
How to Disable Automatic Updates in Windows 10
According to Microsoft, Win 10 will be always up-to-date. There is no direct way to stop automatic updates in Windows 10. The problem is, it not only updates the system applications but also updates the drivers. That is the only reason to hate Windows 10 updates.
- There was a Problem Resetting Your PC in Windows 10
- Increase Internet Speed in Windows 10
- Stop Service Host Delivery Optimization High Network Usage
Windows 10 computers automatically look at for updates and install any upgrades they discover. But, here are a few ways to disable automatic updates completely.
Note: You don’t need to try them all; just work your way down the list until you find the one that works for you.
Pause Automatic Updates in Windows 10
The latest version of Windows 10 allows you to pause the automatic updates for up to 35 days. To temporarily disable automatic updates on your Windows machine, follow the below steps.
1. Open Settings on your computer.
2. Navigate to Update & Security → Windows Update → Advanced options.
3. Under the “Pause updates” sections, click the Pause until drop-down menu and select the time range in which period you don’t want any update. That’s it.
You’ll no longer receive any update till the date you have selected.
Battery Saver Can Block Automatic Updates in Windows 10

Suppose, you are working on the Internet and suddenly you face a slow browsing issue due to a Windows update, then how to pause the update? Just turn on the Battery Saver by clicking on the battery icon.
It is only possible when your Laptop is running on battery. But, if you are on a PC or your laptop is powered by electricity, then you can follow other ways to stop automatic updates.
Turn Off Automatic Updates in Windows 10 with Local Group Policy Editor
Local group policy editor is the best tool to make small tweaks to your windows. Local Group Policy Editor is only available for Professional, Enterprise, or Education editions. If you have a Home version, then you can follow this guide to enable group policy editor in Windows 10 Home. Once you are done, you can follow the below steps to disable the Windows update.
1) Press Start+R on your keyboard and type gpedit.msc and press Enter.
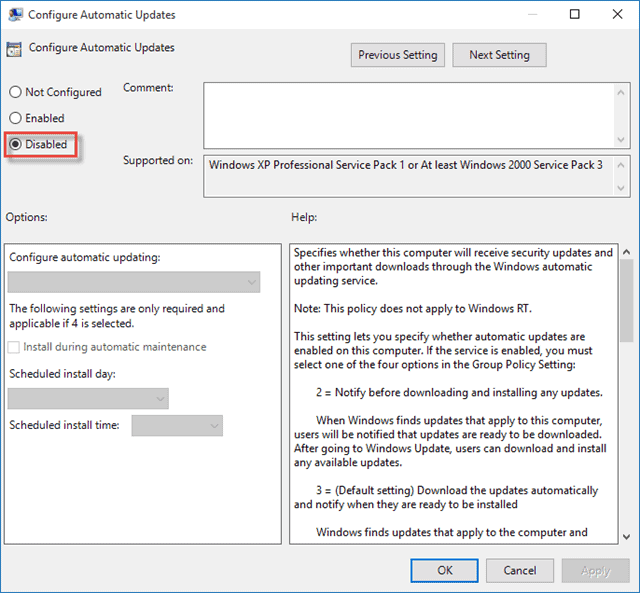
2) In Local Group Policy Editor, navigate to Computer Configuration → Administrative Templates → All Settings and search for Configure Automatic Updates.
3) Open it, click on Disable button and Apply it.
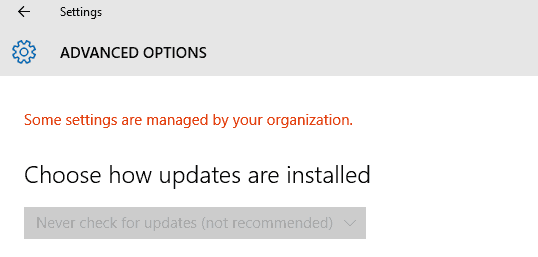
4) In Windows 10 Settings, just go to the Windows update → Advanced Options. Here you can see it is applied to “Never check for updates(not recommended)“.
Stop Automatic Updates using Windows Update Service
Windows Services are an essential part of the Microsoft Windows operating system and also permit the creation and direction of all long-running processes.
Unlike regular software that’s established for the end-user and just runs if the user is logged, Windows Services may begin with no user intervention and might continue to operate after the user has logged off. This is another way to prevent Windows 10 to update automatically as long as you want.
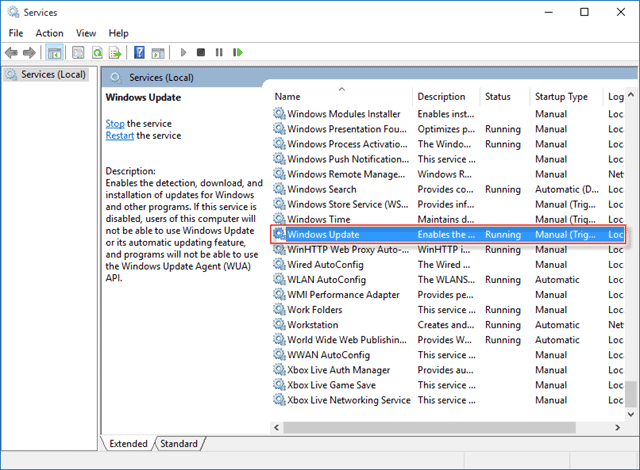
1) Click on the Start button and search for services. Click on it.
2) In the Services window, search for Windows Update and open it.
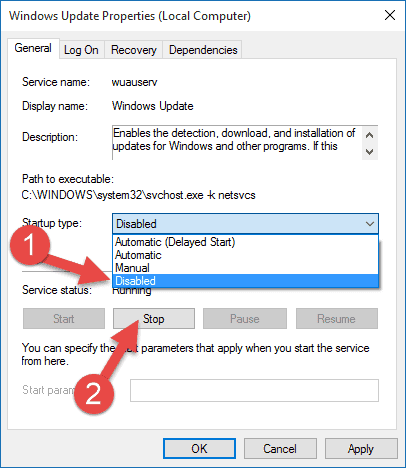
3) Now change the Startup type, Manual to Disable, and click on the Stop button. Now press OK to confirm.
4) Whenever you try to check for updates, it’ll show you an Error.
There were some problems installing updates, but we’ll try again later. If you keep seeing this and want to search the web or contact support for information, this may help: (0x80070422).
5) To enable the update again, just follow the above steps and change Disable to Manual and click on the Start button. That’s it.
How do I turn off Windows Automatic Updates?
In order to turn off Windows Automatic Updates, you need to apply the methods which are mentioned above in this article.
Is it necessary to update your windows always?
Yes, it is necessary to update your windows always because with every new update your system actually gets a newer version of itself and a lot of patches are applied to it to make it more safer and usable.
Conclusion
All these procedures are very useful to turn off automatic updates in Windows 10. All are tested on Windows 10 Pro. If you are a Windows 10 user, then try them and comment on your results. If you have another way to stop the Automatic update, then mention it in the comments.


