
Have you ever used OneDrive on your computer? If not, then you should uninstall OneDrive from Windows 10 to save some space. Basically, OneDrive is a cloud storage platform by Microsoft, like Google Drive and Dropbox.
If you have already used these popular cloud storage, then why should you need another one?
When you install Windows 10 for the first time, the OneDrive program comes with it. It gives you 15GB of cloud storage to back up your computer’s data. You can access this data from anywhere in the world by logging into your account.
The problem is, you need a powerful Internet connection to upload your computer files to it.
Well, I don’t think any of you want to back up your files in OneDrive instead of Google drive. That’s why you all need to fully delete OneDrive from your computer
How to Uninstall OneDrive from Windows 10
Microsoft says if you don’t use OneDrive then unlink the account to stop synchronization. Starting from Windows 10’s Creators Update, you can now easily remove OneDrive like you uninstall other programs from your PC.
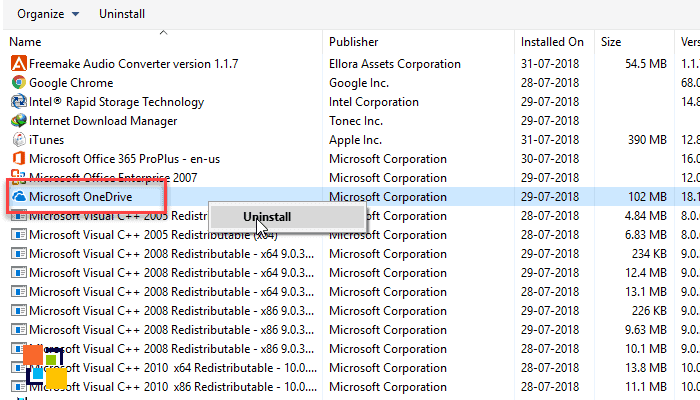
1. First of all, click on the Start Menu and search for Control Panel. Then, open it.
2. Here, you have to click on the “Uninstall a program” option.
3. You’ll see a list of installed programs on your computer. Scroll down and look for “Microsoft OneDrive”.
4. Once you get it, just right-click on it and click the “Uninstall” option. That’s it.
Immediately, the OneDrive will be removed from your computer. You’ll no longer see it in the notification panel.
Another way to Uninstall OneDrive
The last procedure was ok, but as a Windows 10 user, you should follow the current trend. Uninstalling programs from Control Panel is old now, and there is another way to do that.
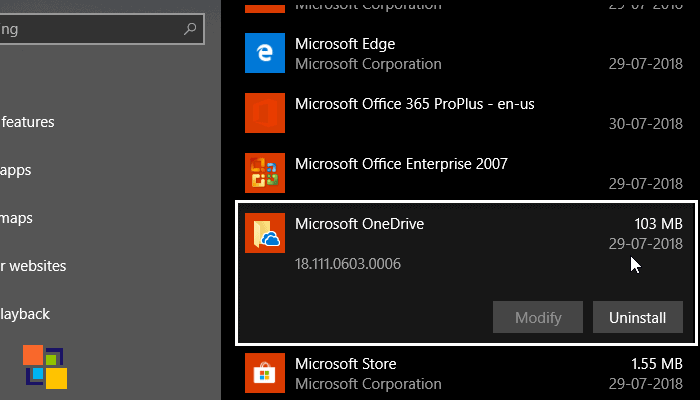
1. Click on Start Menu → Settings or press Win + I keys from your computer to open Windows Settings.
2. Here, navigate to Apps → Apps & features and look for “Microsoft OneDrive”.
3. Just click on it and select the Uninstall button. That’s it.
Like the previous guide, the program will be entirely uninstalled from your Windows 10 computer.
How to Reinstall OneDrive in Windows 10
Have you changed your mind and want to reinstall the OneDrive program again on your computer? If yes, then follow the below procedure. You can install it again without downloading from the Internet. Let’s check how.
If you are using a 64-Bit Windows 10 computer, follow the below path,C:\Windows\SysWOW64
For, 32-bit version, C:\Windows\System32
Here, scroll down and look for OneDriveSetup.exe or you can search it by pressing Ctrl + F keys. Once you get it, double-click on that file to install the program on your Windows machine.
How to Disable OneDrive on Windows 10 Home (File Explorer)
Wait, the tutorial has not been completed yet. After completing the installation process, still, there is a little OneDrive folder in your File Explorer sidebar. For Windows 10 Home users, it’s a little bit tricky to remove it completely.
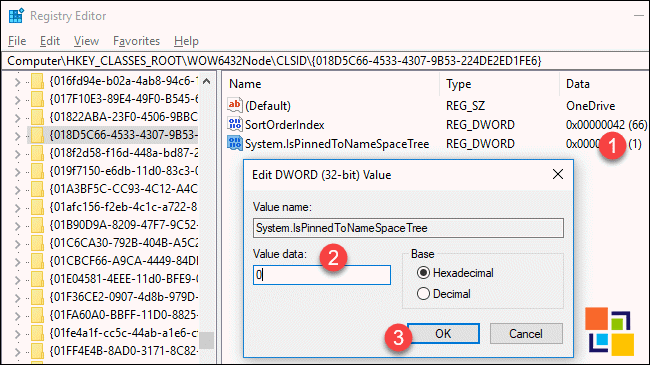
You have to make some Registry changes in order to disable OneDrive from Windows entirely. Search for regedit in the Start Menu and open it. Once you have in the Registry Editor, follow the below path.
32-Bit Version:HKEY_CLASSES_ROOT\CLSID\{018D5C66-4533-4307-9B53-224DE2ED1FE6}
64-Bit Version:HKEY_CLASSES_ROOT\Wow6432Node\CLSID\{018D5C66-4533-4307-9B53-224DE2ED1FE6}
Now double-click the System.IsPinnedToNameSpaceTree option in the right panel, Set value data to 0 and click “OK”.
Immediately the OneDrive folder will be removed from the File Explorer’s sidebar. If it is still showing, then reboot your system once and see the magic.
If you are lazy to do this task, then you can download OneDrive File Explorer Tweak file from the link. There are four files to remove and restore OneDrive from the File Explorer.
Before opening any file, don’t forget to check your Windows version. When you open any of the files according to your requirement, it will make the necessary changes in Registry Editor for you.
Disable OneDrive with Local Group Policy Editor in Windows 10 Pro and Enterprise
If you are using a higher version, like Windows 10 Pro, Enterprise or Education, then there is an easy method available for you. Local Group Policy Editor is not available for Home users, but you can use it in the higher versions to make changes to your computer.
This is a powerful tool to apply different tweaks to your computer, but you must have admin privilege on your computer. Well, let’s jump to the steps.
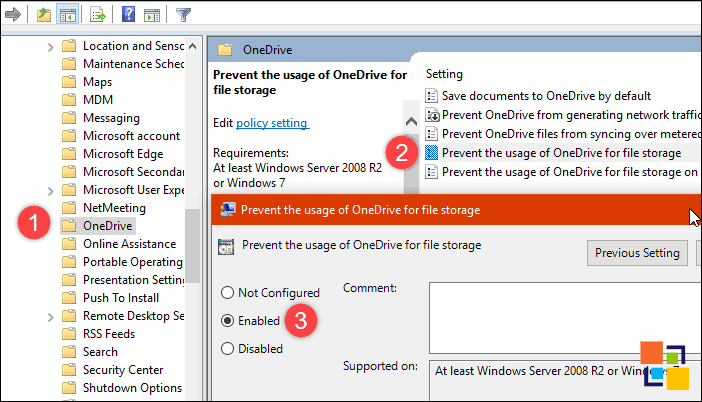
1. On the Start Menu, search for gpedit.msc and open it.
2. From the left panel navigate to the below path,
Computer Configuration → Administrative Templates → Windows Components → OneDrive
3. Now, from the right pane double-click on the “Prevent the usage of OneDrive for file storage” option, set it to “Enabled,” and click “OK.” That’s it.
The OneDrive folder will vanish immediately from the File Explorer’s sidebar. Any time you want it back, the change the option to “Not Configured” instead of “Enabled” in the Local Group Policy Editor.
Why you should remove OneDrive from your Windows 10 System?
OneDrive in itself is a very memory-hogging software that uses up a lot of system resources as well as network data and is completely unnecessary for any user who wishes not to use it.
What are some popular alternatives to OneDrive?
Some popular alternatives of OneDrive are similar cloud storage services such as Dropbox, Google Drive, Apple iCloud Drive, Box, and many more.
Conclusion
Now you know how to disable or uninstall OneDrive from Windows 10 all versions. If you are facing any issue to remove the drive, then feel free to ask here. And, if you like the tutorial, then don’t forget to share it with your friends.


Sorry, but the OneDrive folder is still there taking up at least 80GB of drive c space in Windows 10 pro